Art and Product Managment: Holiday Food as an Iterative Product

I love hamentaschen – a traditional holiday filled cookie – for so many reasons. The mathematics of turning a mostly flat circle into a 3-sided pyramid. The effort of pinching the points, the glorious feeling when the cookies come out of the oven and look great. The social aspects of giving hamentaschen away and baking with friends. The flavor combinations – including savory hamentaschen. And, I mean, it’s a cookie…I love cookies!

Me, filling savory hamentaschen, 2014

As much as preparing food fulfills my desire to provide comfort and nourishment for myself and others, there’s always a background process asking, “how can I make this better?” This is a concept familiar to product managers and engineers alike; my iterative development process is not limited to the computing realm.

Welcome to my kitchen, where culinary craftsmanship meets the art of optimization.

One challenge of holiday baking is that lessons learned can get lost in the flurry of activity and to-do lists. It’s easy to forget previous learnings. Stressful situations like more people than originally planned or too many items for the oven have lead to experiments where I figure out which brisket is more flavorful and fall-off-the-fork delicious – baked in the oven or the slow cooker? (Answer: surprisingly, the oven!)

To combat this challenge, I heavily annotate and change recipes, and keep menu plans with notes of quantities, number of guests, and how well everything worked out.

Holiday food preparation is especially prone to the Pot Roast principle
(reference: https://www.psychologytoday.com/us/blog/thinking-makes-it-so/201402/the-pot-roast-principle). The process is infused with stress – we are usually preparing several dishes, to meet a specific deadline. We don’t have time to question what’s the most efficient use of our time, resources, or even oven space. We may take for granted that a certain food has to be cooked on a stove or in an oven, or even that we should prepare it the same day we eat it.

Savory and sweet hamentaschen from the 2014 epic hamentaschen-baking party!

Another challenge is that often, holiday food preparation can be chaotic because there are multiple dishes to make. I don’t do a big Purim feast (though maybe I will in the future). I especially love Hamentaschen for experimentation because it’s the only recipe I’m making. I have the time and the space to think, “how can I make this better?” and “What about this is really working for me?”

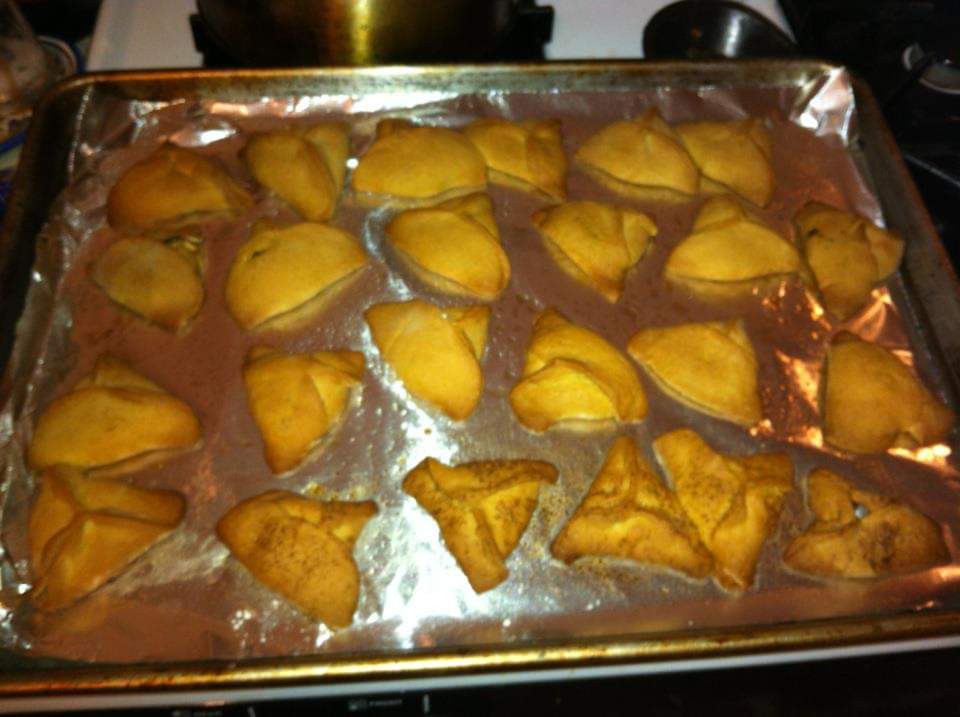
One effect of baking Hamentaschen only once a year is that the iterative process has a long cycle. For example, I prefer a more “open” hamentaschen, where you can see the filling. I learned this after too many years of eating mystery-filled cookies….I like to know what I’m getting into! I don’t like the mystery; if want raspberry and I get chocolate it’s disappointing.

Hamentaschen from 2012 – they’re almost all closed, which has two problems for me: I like to know what’s inside the cookie when I choose it, and I like a dough:filling ratio that has less dough and more filling than these did.

There are so many minor variables that can be changed, and with less frequency, it takes a while to tweak the variables exactly how I like them. For example – many people use jam, or chocolate chips to fill their cookies. I personally don’t like how jam reduces and is sticky, and how chocolate chips are a very dry filling on what is usually a dry, crumbly cookie. In fact, I don’t like a shortbread-style, crumbly cookie for hamentaschen.

For the 20 years I’ve owned the process of baking hamentaschen – e.g. not baking with someone else who dictates the process. I’m still innovating and changing things after all this time, because when you make something once a year, the iterative cycle is long. Interestingly, I’ve not done much experimentation with the dough itself. My family’s recipe uses some orange juice, which solves the problem of a flavorless sweet dough. And my twin brother long ago tripled the amount of butter from our mother’s recipe so the dough is not crumbly.

In addition, inviting people over to make the cookies is not just a fun activity to do with friends. Some of my friends have never made hamentaschen and it’s a lesson in how much of a learning curve making these cookies are. As a product manager, I have to balance being an expert in my product, with working with people who inherently are NOT experts in the product. As a hamentaschen baker, I have to explain to friends how thin to roll out the dough, how big or small of a circle to cut, how much filling to put in, how to make the shape, and how to pinch the edges closed. And of course, how variations in each of those steps change the cookie – some of those changes are objectively “good” or “bad”, but many are personal preference.

The process really brings me back to beginner mindset, reminding me that something I’m an expert in feels easy to me because I have lots of experience in it. For folks who haven’t developed the same experience over years, learning all the details can be overwhelming when they just wanted to come over and bake cookies. Audience expectation and management are important skills!

Bakers try to make sure their hamentaschen hold their shape and don’t flatten. Through the years, I have come to realize that the filling is as important as the dough itself. Chocolate chips are often used as filling, but I find them too dry and hard after baking. I prefer a more brownie-like chocolate filling. While it is popular to use jam or jelly as filling, I personally don’t like that those fillings. They have a tendency to reduce while cooking, which means the end product has less filling, and a different dough-to-filling ratio than I like. Jams and jellies also become watery when heated, so leaks are more prevalent. And I just don’t like the sticky texture of those fillings when cooked.

And it wasn’t until this year that I realized that a filling that does not reduce, has a great side effect – it helps the hamentaschen hold their shape better. So even if the dough flattens a bit, or the edges aren’t pinched well and open, there is no leakage.

All these cookies have the recognizable shape of hamentaschen, even though the levels of “openness” vary, due to the structurally sound filling

Poppy seed filling is traditional, but also one of my favorites. I prefer the Solo brand poppy seed cake and pie filling, where the poppyseeds are combined with just enough of a sticky sweet syrup to hold together. In my area, this filling is most prevalently found in December, so I buy what I need then, otherwise I can’t always find it in the grocery store in February or March when I want it. This is the kind of optimization I do, learned after many years – I buy my hamentaschen filling a few months ahead of time!

One problem my family has had in eating the cookies, is that I like to make both chocolate filled hamentaschen and poppy seed filled hamentaschen. Sometimes it’s hard to tell the difference. This year I got the great idea to fill the poppyseed cookies last, and mix some poppyseeds into the dough so that it is very clear which cookies have poppyseeds and which do not. I lament that it took me over 20 years to come up with this stroke of genius, but it’s to be expected when I only bake hamentaschen once a year.

So, now that this year’s hamentaschen baking is over, what next? I’ve written down my idea for next year. See, my dough recipe makes 4 dozen cookies (cut to 3 inch circles), but the cans of pie filling and my chocolate filling recipe makes enough to fill 3 dozen cookies. It’s not the math that’s difficult, I can multiply by 3/4, but I want to keep some standard measurements – 1/4 cup of orange juice nicely changes into 3 tbsp, but the butter comes out to 153 grams, or 10.8 tablespoons, or 1.35 sticks. None of these are useful for me, so I’ll work on standardizing the recipe without losing any of the characteristics I love about the dough.

Fewer than 1% of meals are holiday meals. Is it ridiculous to optimize, solve challenges, be so attentive to detail, and innovate on something that only happens rarely? Maybe, but that’s just how I am.

Lesson 09: Managing Users and Privileges in MySQL

Notes/errata/updates for Chapter 9:
See the official book errata at http://tahaghoghi.com/LearningMySQL/errata.php – Chapter 9 includes pages 297 – 350.

In the fourth paragraph of this chapter, starting with “Most applications don’t need superuser privileges for day-to-day activities” they give you some reasons why you want to create users without the SUPER privilege. There are better reasons than the book gives, which are at the MySQL Manual page for the SUPER privilege.

In the section “Creating and Using New Users” (p. 300) they say “There’s no limit on password length, but we recommend using eight or fewer characters because this avoids problems with system libraries on some platforms.” You should ignore this, this book was written in 2006 and modern system libraries can handle more than 8 characters in a password. Also ignore it when they say the same thing in the section “Understanding and Changing Passwords” (p. 324).

In the section “Creating a New Remote User” at the very end (p. 214), it talks about using % as a host wildcard character. I want to point out that if there are no ACL’s set for a given host, MySQL will reject ALL connections from that host – even “telnet host 3306” will fail. So if you avoid using %, you are slightly more secure.

In the “Anonymous Users” section (p. 315), one fact that is not mentioned is that for all users, including the anonymous user, any database named “test” or that starts with “test_” can be accessed and manipulated. So an anonymous user can create tables in the “test” database (or even “test_application”) and fill it full of data, causing a denial of service when the disk eventually fills up. This fact is mentioned later in the chapter in the “Default User Configuration” section under “Linux and Mac OS X”, but it should be known earlier.

The “mysqlaccess” utility described in the section of that name (p. 320) is usually not used. These days, folks prefer the pt-show-grants tool. Here is a blog post with some examples of pt-show-grants.

In the section on “Removing Users” (p. 324), it says that if all the privileges are revoked, and a user only has GRANT USAGE, “This means the user can still connect, but has no privileges when she does.” This is untrue, as mentioned before, everyone can access and manipulate databases starting with “test”.

The section “Managing Privileges with SQL” is deprecated (p. 339-346, up to and including “Activating Privileges”). It used to be, back when this was written, that few people used the GRANT statements and more people directly manipulated the tables. These days, it’s the other way around, and due to problems like SQL injection, there are safeguards in place – for example, if you change the host of a user with an ALTER TABLE on the mysql.user table, the user will have all privileges dropped. Just about the only thing direct querying is used for, is to find who has the Super_priv variable set to ‘Y’ in the user table.

Supplemental material: I have a video presentation on security which includes ACLs and there are accompanying PDF slides.

Topics covered:
Creating and dropping local and remote users
Different MySQL privileges
SUPER privilege
GRANT and REVOKE syntax
Hosts and wildcards
Anonymous and default users
Checking privileges
Password management
Basic user security
Resource limit controls

Reference/Quick Links for MySQL Marinate

Lesson 07: Advanced MySQL Querying

Notes/errata/updates for Chapter 7:
See the official book errata at http://tahaghoghi.com/LearningMySQL/errata.php – Chapter 7 includes pages 223 – 275.

Supplemental blog post – ORDER BY NULL – read the blog post and the comments!

GROUP BY and HAVING examples – Supplemental blog post. The example of HAVING in the text shows a use case where HAVING is the same function as WHERE. This blog posts shows examples of HAVING that you cannot do any other way.

In the section called “The GROUP BY clause”, on pages 231-232, the book says:
“you can count any column in a group, and you’ll get the same answer, so COUNT(artist_name) is the same as COUNT(*) or COUNT(artist_id).” This is not 100% true; COUNT does not count NULL values, so if you had 10 rows and 1 artist_name was NULL, COUNT(artist_name) would return 9 instead of 10. COUNT(*) counts the number of rows and would always return 10, so COUNT(*) is preferable when you intend to count the number of rows.

Also in that section, on page 233 when they show you the example:
SELECT * FROM track GROUP BY artist_id;
– Note that they explain the result is not meaningful. In most other database systems, this query would not be allowed.

In the “Advanced Joins” section, specifically on page 238 at the bottom where they say “There’s no real advantage or disadvantage in using an ON or a WHERE clause; it’s just a matter of taste.” While that’s true for the MySQL parser, it’s much easier for humans to read, and see if you missed a join condition, if you put the join conditions in an ON clause.

In the section on Nested Queries, on page 251, it says “nested queries are hard to optimize, and so they’re almost always slower to run than the unnested alternative.” MySQL has gotten better and better at optimizing nested queries, so this statement isn’t necessarily true any more.

A “derived table”, is a nested query in the FROM Clause, as described in the section heading with that name (p. 262).

In the “Table Types” subsection (p. 267), it says that MyISAM is a good choice for storage engines, and that “you very rarely need to make any other choice in small-to medium-size applications”. However, it’s recommended to use InnoDB for better concurrency, transaction support and being safer from data corruption in a crash situation. Indeed, the default storage engine in more recent versions of MySQL is InnoDB.

In addition, the lingo has been changed since the book was written; we now use “storage engine” instead of “table type”. The examples that use CREATE TABLE or ALTER TABLE with TYPE may need to be changed to STORAGE ENGINE instead of TYPE.

Finally, you can skip the section on BDB since it has been deprecated (p. 274-5).

Topics covered:
Aliases
Join style
Joins (JOIN, INNER, COMMA, STRAIGHT, RIGHT, LEFT, NATURAL)
UNION and UNION ALL
Data aggregation (DISTINCT, GROUP BY, HAVING
Subqueries and Nested Queries (including ANY, SOME, ALL, IN, NOT IN, EXISTS, NOT EXISTS, correlated subqueries, derived tables, row subqueries)
User Variables
Transactions/locking
Table Types/Storage engines

Reference/Quick Links for MySQL Marinate

Lesson 06: Working with Database Structures

Notes/errata/updates for Chapter 6:
See the official book errata at http://tahaghoghi.com/LearningMySQL/errata.php – Chapter 6 includes pages 179 – 222.

Other notes:
At the end of the “Creating Tables” section (p.183-4), it says “We like using the underscore character to separate words, but that’s just a matter of style and taste; you could use underscores or dashes, or omit the word-separating formatting altogether.” While this is true, beware of using a dash, because MySQL will try to interpret “two-words”, thinking – is a minus sign. I recommend avoiding dashes for this reason (even though the book does this on page 215).

At the end of the “Collation and Character Sets” section (p.186), it says “When you’re creating a database, you can set the default character set and sort order for the database and its tables.” Note that the default character set for the server will set the default character set for any new databases created if a default character set is not specified; there is no change in existing databases. In turn, the default character set for the database sets the default character set for any new tables created but does not change any existing tables, and the default character set for a table determines the default character set for each column, which can be overridden by specifying a character set when defining a column.

Under the “Other Features” section it references a section called “Table Types”. This section is in chapter 7, p. 267.

Under the “Other Features” section it shows the SHOW CREATE TABLE example (p. 187). By default, MySQL shows you output in horizontal format – that is, one table row is shown as one row in the output. However, you can have MySQL show you output in vertical format, where one column is shows as one row in the output. Instead of using ; to end a query, use \G

Try it with:
SHOW CREATE TABLE artist;
vs
SHOW CREATE TABLE artist\G

And see the difference.

In the “Column Types” section on page 194, it says that “Only one TIMESTAMP column per table can be automatically set to the current date and time on insert or update.” This is not true as of MySQL version 5.6.5 and higher. As per the documentation at https://dev.mysql.com/doc/refman/5.6/en/timestamp-initialization.html: “For any TIMESTAMP or DATETIME column in a table, you can assign the current timestamp as the default value, the auto-update value, or both.”

In the section called “The AUTO_INCREMENT Feature”, on page 211, it says “If, however, we delete all the data in the table, the counter is reset to 1.” The example shows the use of TRUNCATE TABLE. Note that if you deleted all the data in the table with DELETE, such as “DELETE FROM count WHERE 1=1;”, the counter is NOT reset.

Supplemental material:
Data types:
Podcast on Strings
Podcast on Numeric data types
Podcast on ENUM, SET and different SQL modes
Podcast on Times and time zones

Topics covered:
How to CREATE, DROP and ALTER databases, tables, columns and indexes
Collations and character sets
Data types
AUTO_INCREMENT

Reference/Quick Links for MySQL Marinate

MySQL Marinate – So you want to learn MySQL! – START HERE

Want to learn or refresh yourself on MySQL? MySQL Marinate is the FREE virtual self-study group is for you!

MySQL Marinate quick links if you know what it is all about.

This is for beginners – If you have no experience with MySQL, or if you are a developer that wants to learn how to administer MySQL, or an administrator that wants to learn how to query MySQL, this course is what you want. If you are not a beginner, you will likely still learn some nuances, and it will be easy and fast to do. If you have absolutely zero experience with MySQL, this is perfect for you. The first few chapters walk you through getting and installing MySQL, so all you need is a computer and the book.

The format of a virtual self-study group is as follows:
Each participant acquires the same textbook (Learning MySQL, the “butterfly O’Reilly book”, published 2007). You can acquire the textbook however you want (e.g. from the libary or from a friend, hard copy or online). Yes, the book is old, but SQL dates back to at least the 1970’s and the basics haven’t changed! There are notes and errata for each chapter so you will have updated information. The book looks like this:

O'Reilly Butterfly book picture
O’Reilly Butterfly book picture

Each participant commits to reading each chapter (we suggest one chapter per week as a good deadline), complete the exercises and post a link to the completed work.

Each participant obtains assistance by posting questions to the comments on a particular chapter.

Note: There is no classroom instruction.

How do I get started?

– Watch sheeri.com each week for the chapters to be posted.

– Get Learning MySQL
Acquire a book (the only item that may cost money). Simply acquire Learning MySQL – see if your local library has it, if someone is selling their copy, or buy it new.

– Start!
When your book arrives, start your virtual learning by reading one chapter per week. Complete the exercises; if you have any questions, comments or want to learn more in-depth, that’s what the comments for!

FAQs:
Q: Does this cover the Percona patch set or MariaDB forks?

A: This covers the basics of MySQL, which are applicable to Percona’s patched MySQL or MariaDB builds, as well as newer versions of MySQL.

Q: What do I need in order to complete the course?

A: All you need is the book and access to a computer, preferably one that you have control over. Windows, Mac OS X or Unix/Linux will work. A Chromebook or tablet is not recommended for this course.

Q: Where can I put completed assignments?

A: Completed assignments get uploaded to github. See How to Submit Homework

Q: The book was published in 2007. Isn’t that a bit old?

A: Yes! The basics are still accurate, and we will let you know what in the book is outdated. I have contacted O’Reilly, offering to produce a new edition, and they are not interested in updating the book. We will also have optional supplemental material (blog posts, videos, slides) for those who want to learn more right away. We are confident that this self-study course will make you ready to dive into other, more advanced material.

Soak it in!

Reference/Quick Links for MySQL Marinate

Testing Advanced Log Flushing for Percona Audit

We use Percona’s <A HREF=”https://www.percona.com/doc/percona-server/5.5/management/audit_log_plugin.html”>audit log plugin</A> to keep a record of all our logins. Recently we did one of those tasks that everyone knows they should do, but few ever do: change the application user’s password.

When we change the application password, we add a new application user with the proper permissions and a new password, update the information in our repository and wait a while. Using this procedure, any failures mean the old user is used, and more importantly – failure does not impact the end user.

We check the audit logs to see if there were failures – if the user is still being used – when it is no longer in use, we can drop the user.

For reference, here are our settings:

[mysqlaudit]# grep audit /etc/my.cnf
# Percona audit plugin options
audit_log_format = JSON
audit_log_rotate_on_size = 1073741824 . #1G
audit_log_rotations = 10
audit_log_file = /var/log/mysqlaudit/audit.log
audit_log_buffer_size = 4194304
audit_log_strategy = ASYNCHRONOUS
audit_log_policy = LOGINS

This means that we automatically flush logs >1G, keeping 10 audit logs. The other option is to do manual flushing, but we do not want our log files to get very large, and we don’t need to keep audit logs for a very long time.

The ideal behavio – we update our app to the new user, and then flush the logs. That way we could start a new audit log and only have to search the current audit log for the old user. I’m sure people are thinking, “well, it’s set to rotate by size, not manually, so you just cannot do it.” However, binary logs are set the same way and FLUSH LOGS do indeed rotate logs manually, even when auto rotate by size is set.

The tl;dr is that there is currently no way to do this without restarting MySQL. The audit_log_rotate_on_size variable is not dynamic, so we could not set it to manual without restarting MySQL. Here are some other tests we did to see if we could force an audit log flush while using the auto rotate:

We tried moving the audit logs and flushing:

[ ~]# cd /var/log/mysqlaudit/
[mysqlaudit]# ls -l
total 1459572
-rw-rw—- 1 mysql mysql 420839439 Mar 31 11:04 audit.log
-rw-rw—- 1 mysql mysql 1073749720 Mar 25 08:50 audit.log.01
[mysqlaudit]# mv audit.log.01 audit.log.02
[mysqlaudit]# mv audit.log audit.log.01
[mysqlaudit]# ls
audit.log.01 audit.log.02

Don’t worry, this doesn’t affect writing the file – the inode is still in MySQL and it still writes to the file, now called audit.log.01:
[mysqlaudit]# ls -l
total 1459652
-rw-rw—- 1 mysql mysql 420925253 Mar 31 11:07 audit.log.01
-rw-rw—- 1 mysql mysql 1073749720 Mar 25 08:50 audit.log.02
[mysqlaudit]# ls -l
total 1459652
-rw-rw—- 1 mysql mysql 420925253 Mar 31 11:07 audit.log.01
-rw-rw—- 1 mysql mysql 1073749720 Mar 25 08:50 audit.log.02
[mysqlaudit]# mysql -u sheeri.cabral -p -e “FLUSH LOGS;”
Enter password:
[mysqlaudit]# ls -l
total 1459688
-rw-rw—- 1 mysql mysql 420958983 Mar 31 11:07 audit.log.01
-rw-rw—- 1 mysql mysql 1073749720 Mar 25 08:50 audit.log.02

Note that this also proves that “FLUSH LOGS” does not close and open the audit log.

Can we force it? Let’s try by setting the audit_log_policy to NONE and then to LOGINS (what we have it as by default):

[mysqlaudit]# mysql -u sheeri.cabral -p -e “set global audit_log_policy=NONE; set global audit_log_policy=LOGINS”
Enter password:
[mysqlaudit]# ls -l
total 1459768
-rw-rw—- 1 mysql mysql 421043317 Mar 31 11:10 audit.log.01
-rw-rw—- 1 mysql mysql 1073749720 Mar 25 08:50 audit.log.02

Here’s another failed test – let’s see if we can disable then enable the plugin:
[mysqlaudit]# mysql -u sheeri.cabral -p -e “UNINSTALL PLUGIN audit_log”
Enter password:
[mysqlaudit]# ls -rlth
total 1.4G
-rw-rw—- 1 mysql mysql 1.1G Mar 25 08:50 audit.log.01
-rw-rw—- 1 mysql mysql 403M Mar 31 11:44 audit.log
[mysqlaudit]# mysql -u sheeri.cabral -p -e “INSTALL PLUGIN audit_log SONAME ‘audit_log.so’; ”
Enter password:
ERROR 1125 (HY000) at line 1: Function ‘audit_log’ already exists
[mysqlaudit]# mysql -u sheeri.cabral -p
Enter password:
Welcome to the MySQL monitor. Commands end with ; or \g.
Your MySQL connection id is 1375345
Server version: 5.5.51-38.1-log Percona Server (GPL), Release 38.1, Revision b4a63b4

Copyright (c) 2009-2016 Percona LLC and/or its affiliates
Copyright (c) 2000, 2016, Oracle and/or its affiliates. All rights reserved.

Oracle is a registered trademark of Oracle Corporation and/or its
affiliates. Other names may be trademarks of their respective
owners.

Type ‘help;’ or ‘\h’ for help. Type ‘\c’ to clear the current input statement.

[(none)]> \P grep -i audit
PAGER set to ‘grep -i audit’
[(none)]> SHOW PLUGINS;
| audit_log | DELETED | AUDIT | audit_log.so | GPL |
41 rows in set (0.00 sec)

[(none)]> INSTALL PLUGIN audit_log SONAME ‘audit_log.so’;
ERROR 1125 (HY000): Function ‘audit_log’ already exists

So, I ended up needing to restart MySQL if I wanted to re-enable the plugin.

Sometimes the failures are the most illuminating!

[I realize that the plugin probably could not hack FLUSH LOGS but it would be great to get FLUSH AUDIT or something similar…]

MySQL DevOps First Step: Revision Control

MySQL environments are notorious for being understaffed – MySQL is everywhere, and an organization is lucky if they have one full-time DBA, as opposed to a developer or sysadmin/SRE responsible for it.

That being said, MySQL is a complex program and it’s useful to have a record of configuration changes made. Not just for compliance and auditing, but sometimes – even if you’re the only person who works on the system – you want to know “when was that variable changed?” In the past, I’ve relied on the timestamp on the file when I was the lone DBA, but that is a terrible idea.

I am going to talk about configuration changes in this post, mostly because change control for configuration (usually /etc/my.cnf) is sorely lacking in many organizations. Having a record of data changes falls under backups and binary logging, and having a record of schema changes is something many organizations integrate with their ORM, so they are out of scope for this blog post.

Back to configuration – it is also helpful for disaster recovery purposes to have a record of what the configuration was. You can restore your backup, but unless you set your configuration properly, there will be problems (for example, an incompatible innodb_log_file_size will cause MySQL not to start).

So, how do you do this? Especially if you have no time?

While configuration management systems like chef, puppet and cfengine are awesome, they take setup time. If you have them, they are gold – use them! If you do not have them, you can still do a little bit at a time and improve incrementally.

If you really are at the basics, get your configurations into a repository system. Whether you use rcs, cvs, subversion or git (or anything else), make a repository and check in your configuration. The configuration management systems give you bells and whistles like being able to make templates and deploying to machines.

It is up to you what your deployment process is – to start, something like “check in the change, then copy the file to production” might be good enough, for a start – remember,  we’re taking small steps here. It’s not a great system, but it’s certainly better than not having any revision control at all!

A great system will use some kind of automated deployment, as well as monitoring to make sure that your running configuration is the same as your configuration file (using <A HREF=”https://www.percona.com/doc/percona-toolkit/3.0/pt-config-diff.html”>pt-config-diff). That way, there are no surprises if MySQL restarts.

But having a great system is a blog post for another time.

Generating a MySQL Password

One of the services our database engineers provide is adding users to MySQL. We have some nice Chef recipes, so all I have to do is update a few files, including adding in the MySQL password hash.

Now, when I added myself, I just logged into MySQL and generated a password hash. But when my SRE (systems reliability engineer) colleague needed to generate a password, he did not have a MySQL system he could login to.

The good news is it’s easy to generate a MySQL password hash. The MySQL password hash is simply a SHA1 hash of a SHA1 hash, with * at the beginning. Which means you do not need a MySQL database to create a MySQL password hash – all you need is a programming language that has a SHA1 function (well, and a concatenate function).

And I found it, of course, on this post at StackExchange (http://unix.stackexchange.com/a/234592/217471). So you don’t have to click through, here is what it says – and I have tested all these methods and I get the same password hash. I have changed their example of “right” to “PASSWORD HERE” so it’s more readable and obvious where the password goes, in case you copy and paste from here.

Some one-liners:

**MySQL** (may require you add -u(user) -p):

mysql -NBe "select password('PASSWORD HERE')"

**Python**:

python -c 'from hashlib import sha1; print "*" + sha1(sha1("PASSWORD HERE").digest()).hexdigest().upper()'

**Perl**:

perl -MDigest::SHA1=sha1_hex -MDigest::SHA1=sha1 -le ‘print “*”. uc sha1_hex(sha1(“PASSWORD HERE”))’

**PHP**:

php -r 'echo "*" . strtoupper(sha1(sha1("PASSWORD HERE", TRUE))). "\n";'

Hopefully these help you – they enabled my colleagues to easily generate what’s needed without having to find (or create) a MySQL instance that they can already login to.

Learn MySQL for Free with MySQL Marinate, Season 3!

The 3rd season of MySQL Marinate begins October 1st, 2013*. Join the meetup group and RSVP at season 3 to join! You can do the work on MySQL, or if you prefer, MariaDB or Percona. If you do not have … Continue reading

The 3rd season of MySQL Marinate begins October 1st! Join the meetup group and RSVP at season 3 to join! You can do the work on MySQL, or if you prefer, MariaDB or Percona.

If you do not have the book yet, you can still do the first week by using the online material from Browse Contents on the OReilly book page for Learning MySQL. There is homework for week 1, see the master list for all the information.

If you would like to learn MySQL from the ground up, consider joining us. This is for beginners If you have no experience with MySQL, or if you are a developer that wants to learn how to administer MySQL, or an administrator that wants to learn how to query MySQL, this course is what you want.

If you are not a beginner, you are welcome to join too maybe you need a refresher, or maybe you just want to test your knowledge or earn badges. Thats OK too!

The format of a virtual self-study group is as follows:

Each participant acquires the same textbook (Learning MySQL, the butterfly OReilly book, published 2007). You can acquire the textbook however you want (e.g. from the libary or from a friend) but if you buy the book, we ask that you buy it from our Amazon Store, to help pay for meetup fees.

Each participant commits to read one chapter per week, complete the exercises and post a link to the completed work. Tweet using the hashtag #mysqlmarinate.

Each participant obtains assistance by posting questions to a discussion area set up on the Virtual Tech Self Study Message Board for each chapter.

Each participant receives a badge upon finishing each chapter and all assignments.

Note: There is no classroom or video instruction.

How do I get started?

Become a member of the Virtual Tech Self Study Meetup Group.

Register for MySQL Marinate. RSVP to this event: Yes

Acquire the book (the only item that may cost money). Get your hands Learning MySQL see if your local library has it, if someone is selling their copy, or buy it from our Amazon Store (this helps pay for meetup fees).

When your book arrives, start your virtual learning by reading one chapter per week. Complete the exercises; if you have any questions, comments or want to learn more in-depth, thats what the forums are for!

Learning MySQL

FAQs:

Q: How long will the course last?

A: We will cover 12 lessons (chapters) in the book, so 12 (twelve) weeks starting October 1st, though we will have one week that is a break so that you can catch up if you need to or you have a week off if you need it. Refer to the MySQL Marinate Season 3 Master Discussion List for specific dates.

By January 1st, 2014, you will know MySQL!!

Q: Can I get ahead?

A: Sure! This is go-at-your-own-pace. To prevent spoilers, please put comments in the appropriate chapter threads.

Q: Does this cover the Percona patch set or MariaDB forks?

A: This covers the basics of MySQL, which are immediately transferable to Perconas patched MySQL or MariaDB builds.

Q: What do I need in order to start the course?

A: All you need is the book and access to a computer, preferably one that you have control over. Installing MySQL is chapter 2, so really, all you need is the book and a computer to start, you dont have to worry about any prerequisites. If you do not have the book yet, you can still do the first week by using the online material from Browse Contents at the OReilly Learning MySQL page.

Q: Where can I put completed assignments?

A: You will be able to put completed assignments on github. Instructions are in week 1.

Q: The book was published in 2007. Isnt that a bit old?

A: Yes! OReilly is working on new material, but it is not ready yet. The basics are still accurate, and we will let you know what in the book is outdated. We will also have optional supplemental/extra credit material for those who want to learn more right away. We are confident that this self-study course will make you ready to dive into other, more advanced material.

Soak it in!

*either tomorrow or today, depending on when and where you read this. Or it was in the past, if you have to catch up on your blog posts. Its OK, you can join us late, too. You can go at your own pace.

What is an “unauthenticated user”?

Every so often we have a client worrying about unauthenticated users. For example, as part of the output of SHOW PROCESSLIST they will see:

+-----+----------------------+--------------------+------+---------+------+-------+------------------+
| Id  | User                 | Host               | db   | Command | Time | State | Info             |
+-----+----------------------+--------------------+------+---------+------+-------+------------------+
| 235 | unauthenticated user | 10.10.2.74:53216   | NULL | Connect | NULL | login | NULL             |
| 236 | unauthenticated user | 10.120.61.10:51721 | NULL | Connect | NULL | login | NULL             |
| 237 | user                 | localhost          | NULL | Query   | 0    | NULL  | show processlist |
+-----+----------------------+--------------------+------+---------+------+-------+------------------+

Who are these unauthenticated users, how do they get there, and why aren’t they authenticated?

The client-server handshake in MySQL is a 4-step process. Those familiar with mysql-proxy already know these steps, as there are four functions that a Lua script in mysql-proxy can override. The process is useful to know for figuring out exactly where a problem is when something breaks.
(more…)

Every so often we have a client worrying about unauthenticated users. For example, as part of the output of SHOW PROCESSLIST they will see:

+-----+----------------------+--------------------+------+---------+------+-------+------------------+
| Id  | User                 | Host               | db   | Command | Time | State | Info             |
+-----+----------------------+--------------------+------+---------+------+-------+------------------+
| 235 | unauthenticated user | 10.10.2.74:53216   | NULL | Connect | NULL | login | NULL             |
| 236 | unauthenticated user | 10.120.61.10:51721 | NULL | Connect | NULL | login | NULL             |
| 237 | user                 | localhost          | NULL | Query   | 0    | NULL  | show processlist |
+-----+----------------------+--------------------+------+---------+------+-------+------------------+

Who are these unauthenticated users, how do they get there, and why aren’t they authenticated?

The client-server handshake in MySQL is a 4-step process. Those familiar with mysql-proxy already know these steps, as there are four functions that a Lua script in mysql-proxy can override. The process is useful to know for figuring out exactly where a problem is when something breaks.

Step 1: Client sends connect request to server. There is no information here (as far as I can tell). However, it does mean that if you try to connect to a host and port of a mysqld server that is not available, you will get

ERROR 2003 (HY000): Can't connect to MySQL server on '[host]' (111)

Step 2: The server assigns a connection and sends back a handshake, which includes the server’s mysqld version, the thread id, the server host and port, the client host and port, and a “scramble buffer” (for salting authentication, I believe).

It is during Step 2 where the connections show up in SHOW PROCESSLIST. They have not been authenticated yet, but they are connected. If there are issues with authentication, connections will be stuck at this stage. Most often stuck connections are due to DNS not resolving properly, which the skip-name-resolve option will help with.

Step 3: Client sends authentication information, including the username, the password (salted and hashed) and default database to use. If the client sends an incorrect packet, or does not send authentication information within connect_timeout seconds, the server considers the connection aborted and increments its Aborted_connects status variable.

Step 4: Server sends back whether the authentication was successful or not. If the authentication was not successful, mysqld increments its Aborted_connects status variable and sends back an error message:

ERROR 1045 (28000): Access denied for user 'user'@'host' (using password: [YES/NO])

Hope this helps!