In my last post, a tale of two MySQL upgrades, a few folks asked if I would outline the process we used to upgrade, and what kind of downtime we had.
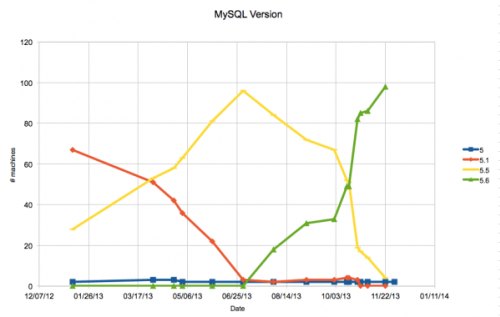
Well, the processes were different for each upgrade, so I will tackle them in separate blog posts. The first step was to upgrade all our MySQL 5.1 machines to MariaDB 5.5. As mentioned in the previous post, MariaDBs superior performance for subqueries is why we switched and we switched back to MySQL for 5.6 to take full advantage of the performance_schema.
It is not difficult to blog about our procedure, as we have documentation on each process. My first tip would be to do that in your own environment. This also enables other folks to help, even if they are sysadmins and not normally DBAs. You may notice the steps contain items that might be obvious to someone who has done maintenance before we try to write them detailed enough that if you were doing it at 3 am and a bit sleep-deprived, you could follow the checklist and not miss anything. This also helps junior and aspiring DBAs not miss any steps as well.
The major difference between MySQL 5.1 and MySQL 5.5 (and its forks, like MariaDB) is that FLOAT columns are handled differently. On MySQL 5.1, a float value could be in scientific notation (e.g. 9.58084e-05) and in 5.5, its not (e.g. 0.0000958084). This makes checksumming difficult, as all FLOAT values will show differences even when they are the same number. There is a workaround for this, devised by Shlomi Noach.
We have an n+1 architecture for databases at Mozilla this means that we have an extra server. If we need 1 master and 3 slaves, then n+1 is 1 master and 4 slaves. Because of this, there are 2 different ways we upgrade the first slave we upgrade, and subsequent slaves/masters.
These steps are copied and pasted from our notes, with minor changes (for example, item #2 is send out maintenance notices but in our document we have the e-mail addresses to send to).
Assumptions: Throughout these notes we use /var/lib/mysql, as that is our standard place for MySQL. You may need to change this to suit your environment. We are also using Red Hat Enterprise Linux for our operating system, so this procedure is tailored to it (e.g. yum install/yum remove). We control packages using the freely available puppet mysql module we created.
For the first slave
The overall procedure is to perform a logical backup the database, create a new empty installation of the new server version, and import the backup. Replication does work from MySQL 5.1 to MariaDB 5.5 and back (at least, on the 25 or so clusters we have, replication worked in both directions. Your mileage may vary).
1. Make sure the slave has the same data as the master with checksums (the previous checksum is fine, they should be running every 12 hours).
2. Send out maintenance notices.
3. Take the machine out of any load balanced services, if appropriate
4. Set appropriate downtimes in Nagios
5. Start a screen session on the server
6. Do a SHOW PROCESSLIST to see if there are any slaves of the machine. If so, move them to another master if they are needed. [we have a different checklist for this]
7. Do a SHOW SLAVE STATUS to see if this machine is a slave.
a. If this machine is a slave, ensure that its master will not delete its binlogs while the upgrade is occurring.
b. If this machine is a slave, do a SLAVE STOP; and copy the master.info file somewhere safe [or the slave_master_info table if using that]
8. Stop access to the machine from anyone other than root (assuming you are connecting from root):
UPDATE mysql.user SET password=REVERSE(password) WHERE user!='root'; FLUSH PRIVILEGES;
9. See what the default character set is for the server and databases:
SHOW VARIABLES LIKE 'character_set_server'; SHOW VARIABLES LIKE 'character_set_database';

SELECT SCHEMA_NAME FROM INFORMATION_SCHEMA.SCHEMATA WHERE DEFAULT_CHARACTER_SET_NAME!='utf8' AND SCHEMA_NAME NOT IN ('mysql');
If applicable, change the server defaults to UTF8 and change databases to utf8 with ALTER DATABASE dbname DEFAULT CHARACTER SET utf8;
10. Stop access to the machine from anyone other than root (assuming you are connecting from root): UPDATE mysql.user SET password=REVERSE(password) WHERE user!='root'; FLUSH PRIVILEGES;
11. Check to see how big the data is:
mysql> SELECT SUM(DATA_LENGTH)/1024/1024/1024 AS sizeGb FROM INFORMATION_SCHEMA.TABLES WHERE TABLE_SCHEMA!='information_schema';
12. Determine how you can export the data, given the size. You may be able to export without compression, or you may need to do a mysqldump | gzip -c > file.sql, then compress the old data files instead of just moving them aside.
13. Do a du -sh * of the datadir and save for later, if you want to compare the size of the database to see how much space is returned after defragmenting
14 .Export the data from all databases, preserving character set, routines and triggers. Record the time for documentations sake. Im assuming the character set from step 9 is utf8 (if its something like latin1, youll need to put in default-character-set=latin1 in the command). If the machine has slaves, make sure to use master-data=1. If you need to compress, change the shell command accordingly:
time mysqldump --all-databases --routines --triggers --events > `date +%Y-%m-%d`_backup.sql
15. Stop MySQL
16. Copy the config file (usually /etc/my.cnf) to a safe place (like /etc/my.cnf.51)
17. Do a rpm -qa | egrep -i "percona|mysql". Do a yum remove for the mysql/percona packages. Its OK if it also removes related packages, like perl-DBD, but make a note of them, because you will want to reinstall them later. Sample:
yum remove Percona-Server-client Percona-Server-shared-compat Percona-XtraDB-Cluster-devel Percona-Server-server
18. Move the /var/lib/mysql directory to /var/lib/mysql-old. Compress any files that need compression (if you need to compress, to decompress the sql file). If you absolutely cannot keep the files, see if you can copy them somewhere. We really want to preserve the old data directory just in case we need to revert.
19. Decompress the sql file, if applicable.
20. Install the proper packages by changing puppet to use maridb55 instead of mysql51 or percona51. Verify with rpm -qa | egrep -i percona|mysql|maria
[this may be different in your environment; we use the freely available puppet mysql module we created.
21. Run mysql_install_db
22. Make any changes to /etc/my.cnf (e.g. run puppet). When going from MySQL 5.1 to 5.5, there are no particular global changes Mozilla made.
– when we went from MySQL 5.0 to MySQL 5.1, we did a global change to reflect the new slow query log options.
23. chown -R mysql:mysql /var/lib/mysql/
24. chmod 775 /var/lib/mysql
25. Start MySQL and check the error logs for any warnings. Get rid of any warnings/errors, and make sure MySQL is running.
26. Turn off binary logging. Import the export, timing how long it takes, for reference:
time mysql < YYYY_MM_DD_backup.sql
27. Restart MySQL and look for errors, you may need to run mysql_upgrade.
28. Turn on binary logging, if applicable.
29. Test.
30. If this machine was a slave, re-slave it. Let it catch up, making sure there are no data integrity errors, and no replication errors.
31. Reinstate permissions on the users:
UPDATE mysql.user SET password=REVERSE(password) WHERE user!='root'; FLUSH PRIVILEGES;
32. Re-slave any slaves of this machine, if needed.
33. Turn back on Nagios, making sure all the checks are green first.
34. Run a checksum on the master to propagate to this slave, and double-check data integrity on the slave. Note that you will want to use –ignore-columns with the output of this command in the checksum, to avoid false positives from scientific notation change (see http://www.sheeri.com/mysql-5-1-vs-mysql-5-5-floats-doubles-and-scientific-notation/)
Find FLOAT/DOUBLE fields to ignore in checksum: SELECT GROUP_CONCAT(DISTINCT COLUMN_NAME) FROM INFORMATION_SCHEMA.COLUMNS WHERE DATA_TYPE IN ('float','double') AND TABLE_SCHEMA NOT IN ('mysql','information_schema','performance_schema');
35. Put the machine back into the load balancer, if applicable.
36. Inform folks the upgrade is over
On the first upgrade, we did what is usually recommended – do a logical export with mysqldump, and then an import. With other upgrades in the same replication hierarchy, we can take advantage of Xtrabackup to stream the new version directly to the machine to be upgraded.
The general procedure here is similar to the above, except that a logical export is not taken. After preparation steps are taken, a new empty MariaDB 5.5 server is installed. Then we use xtrabackup to backup and restore the existing MariaDB 5.5 server to the machine we are upgrading.
For subsequent slaves, and the master
- Coordinate with affected parties ahead of time
- Send out any notices for downtime
- Take the machine out of any load balanced services, if appropriate. If the machine is a master, this means failing over the master first, so that this machine becomes a regular slave. [we have a different checklist for how to failover]
- Set appropriate downtimes in Nagios, including for any slaves
- Start a screen session on the server
- Do a SHOW PROCESSLIST to see if there are any slaves of the machine. If so, move them to another master if they are needed.
- Do a SHOW SLAVE STATUS to see if this machine is a slave.
- If this machine is a slave, ensure that the master will not delete its binlogs while the upgrade is occurring.
- If this machine is a slave, do a SLAVE STOP; and copy the master.info file somewhere safe
- If this machine is a slave, do a SLAVE STOP; and copy the master.info file somewhere safe
- Save a list of grants from pt-show-grants, just in case there are users/permissions that need to be preserved. [this is done because sometimes masters and slaves have different users, though we try to keep everything consistent]
- Figure out how big the backup will be by doing a
du -shon the datadir of the already-upgraded machine to be backed up, and make sure the new machine has enough space to keep the old version and have the new version as well. - Stop MySQL on the machine to be upgraded.
- Copy the config file (usually /etc/my.cnf) to a safe place (like /etc/my.cnf.51)
- Do a
rpm -qa | egrep -i "mysql|percona". Do ayum removefor the mysql packages (at least mysql-server, mysql). Its OK if it also removes related packages, like perl-DBD, but make a note of them, because you will want to reinstall them later. - Move the /var/lib/mysql directory to /var/lib/mysql-old. Compress any files that need compression. If you absolutely cannot keep the files, see if you can copy them somewhere. We really want to preserve the old data directory just in case we need to revert.
- Install the proper packages by changing puppet to use maridb55 instead of mysql51 or percona51, running puppet manually. Verify with
rpm -qa | egrep -i "percona|mysql|maria" - Run mysql_install_db
- Make any changes to /etc/my.cnf (or run puppet). When going from MySQL 5.1 to 5.5, there are no particular changes.
chown -R mysql:mysql /var/lib/mysql/chmod 775 /var/lib/mysql- Start MySQL and check the error logs for any warnings. Get rid of any warnings/errors, and make sure MySQL is started.
- Stop MySQL, and move or delete the datadir that was created on upgrade.
- If you are directly streaming the backup to the machine to be upgraded, do this on the machine to be upgraded:
cd $DATADIR

nc -l 9999 | tar xfi - - On the machine to be backed up (that is already upgraded), in a screen session, making sure you get any slave info:
time innobackupex --slave-info --stream=tar $DATADIR | nc (IP/hostname) 9999 - Once xtrabackup is complete, fix permissions on the datadir:
chown -R mysql:mysql /var/lib/mysql/

chmod 775 /var/lib/mysql - Prepare the backup:
time innobackupex --apply-logs --target-dir=/var/lib/mysql - Fix permissions on the datadir again:
chown -R mysql:mysql /var/lib/mysql/

chmod 775 /var/lib/mysql - Restart MySQL and look for errors
- Test.
- If this machine was a slave, re-slave it. Let it catch up, making sure there are no data integrity errors, and no replication errors.
- Re-slave any slaves of this machine, if needed.
- Turn back on Nagios, making sure all checks are green first.
- Put the machine back into the load balancer, if applicable.
- Inform folks the upgrade is over
Its long and detailed, but not particularly difficult.